How Sextants Work: An Illustrated Guide
When learning how to use the sextant, one of the most important first steps is to understand how it works.
I have spent the last 10 years learning how my sextant works, picking up a lot of useful tips along the way. To consolidate all that experience, I have put together this guide with the intention of sharing that knowledge with you.
A sextant is a navigational instrument that measures the angle between two objects. It uses a pair of mirrors to overlay one object over the other. The angle between the objects is proportional to the angle between the mirrors, so you can read it directly from the arc of the sextant.
In the diagram below, you can see a sextant measuring the altitude of the sun. The light travels from the sun to the index mirror, then it is reflected to the horizon mirror and finally into your eye. Simultaneously, the light travels from the horizon, straight through the horizon mirror to your eye.
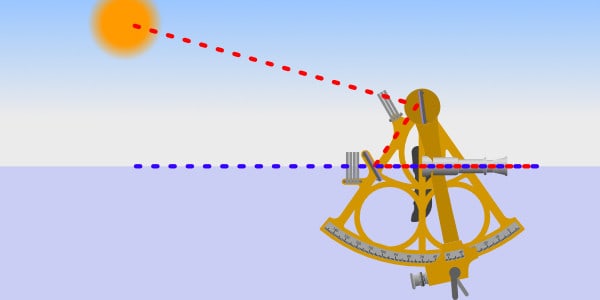
In this setting, the angle between the mirrors is such that the sun and horizon are superimposed over each other.
The altitude of the sun is then found by reading the angle from the arc of the sextant.
It sounds simple enough, so now let’s take a look at exactly how it all works.
The sextant principle
The sextant uses the Principle of Double Reflection: When a ray of light is reflected from two mirrors in succession, the angle between the incident ray and reflected ray is twice the angle between the mirrors.
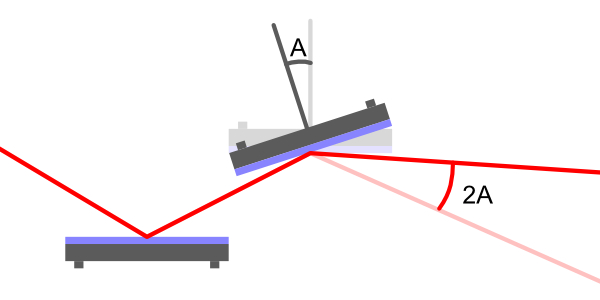
The sextant uses two mirrors, the index mirror and the horizon mirror, to set up a double reflection situation.
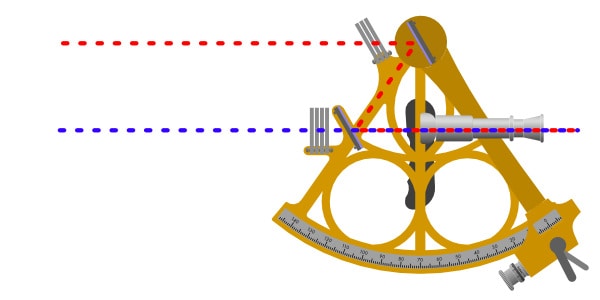
When set at 0°, the mirrors are parallel and there is no deflection in the beam of light.
By adjusting the angle of the index mirror using the clamp and micrometer at the base of the index arm, you can deflect the beam of light coming into the instrument.
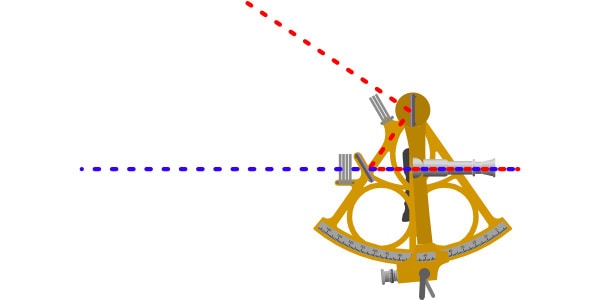
As you can see in the image above, a celestial body with an altitude of 60° would be measured by turning the index mirror 30° off parallel.
The principle of double reflection means that you can measure celestial bodies twice as high as the index mirror can move.
Interestingly, a sextant gets its name because its arc covers ⅙ of a circle, or 60°. Due to the double reflection principle, a 60° angle between the mirrors can measure altitudes up to 120°.
Parts of a sextant

Index Mirror
The index mirror is a fully reflective mirror that is used to reflect an image of the body you are measuring towards the horizon mirror.
Its rotation is controlled through its direct connection to the index arm.
Horizon Mirror
The horizon mirror is a partial mirror that enables the user to overlay the reflected image from the index mirror, with the horizon viewed right ahead.
It is fixed rigidly to the frame of the sextant.
Horizon mirrors come in two styles: a split mirror or a full semi-silvered mirror.

Telescope
The telescope is used for viewing the body that the sextant is measuring.
When the sextant is set at 0°, the user can look down the telescope at the body you are measuring.
Telescopes on a sextant do not need to provide magnification, so on some cheaper models, you will probably find the telescope is just a simple viewfinder instead.
Shades
The shades are found in front of the horizon mirror and the index mirror and are named according to their respective mirror.
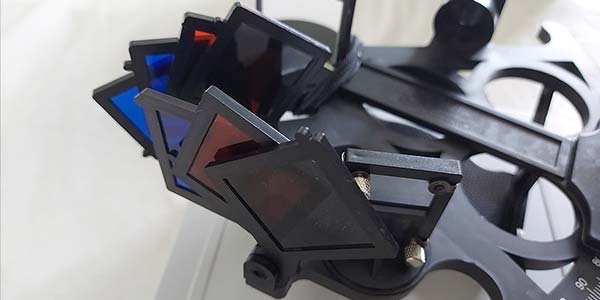
You use different combinations of shades to protect your eyes when looking at bright objects like the sun.
When initially lining up the sextant on the sun, you should have all the shades in place. Then, as you bring the instrument down to the horizon, you can remove the horizon shades, if necessary to see the horizon clearly.
When using the sextant during twilight, you will often find that shades are not necessary.
Do you want to know why twilight is the best time for sights? You should read this article: Best Times To Use A Sextant
Index Arm
The index arm is the movable part of the sextant, used to alight the index mirror. The index arm and the index mirror are connected rigidly to each other.
It is attached to the top of the frame with a bearing, allowing it to move smoothly.
At the other end, it is controlled precisely using the clamp and micrometer to position it along the arc.
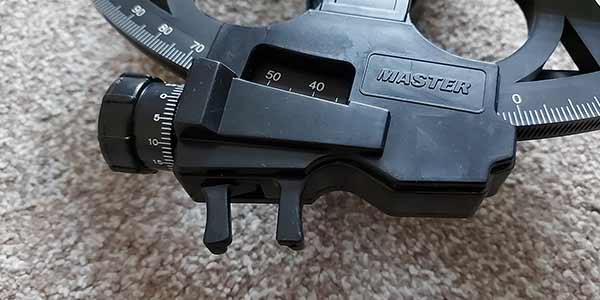
Arc
The arc is the curved part of the sextant frame which is etched with numbers to read off the deflection of the index mirror.
The numbers along the arc tell you the altitude of the body you are measuring, so you do not need to worry about understanding the double reflection principle.
You’ll notice that the arc spans 60°, but shows readings up to 120°. This is because it tells you the deflection of the beam of light rather than the deflection of the index mirror.
Along the arc, you read whole degrees. Using the arc alone will only provide accuracy to the closest degree. For full accuracy, you use the micrometer in combination with the increments along the arc.
Micrometer
The micrometer is mounted on the end of the index arm and is used to take a precise measurement of the altitude of the body you are observing.
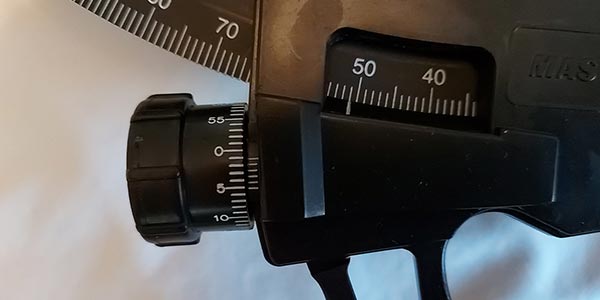
Looking through the sextant, you slowly turn the micrometer to make fine adjustments and line up the reflected image with the horizon.
Once lined up, you can read minutes and seconds from the micrometer.
My sextant allows readings to the nearest 0.2 minutes, but there are more expensive sextants that can give readings up to 0.1 minutes.
Clamp
The clamp allows a sextant user to release the index arm and move it without using the micrometer.
When looking at a celestial body, you release the clamp to bring the horizon mirror down to the horizon while still keeping the body lined up in the index mirror.
Frame
The frame is the solid part of the sextant that all other parts are mounted on.
It can either be made from metal or plastic, depending on the construction material of the sextant you have purchased.
Sextant errors and corrections
For a sextant to work to its maximum accuracy, proper care needs to be taken to account for its potential errors.
For a complete breakdown of the errors and corrections in a sextant, you can read this article: Sextant Errors & Corrections.
For now, we can summarise them by considering correctable and non-correctable errors.
Correctable sextant errors
Correctable errors are ones that you should aim to remove every time you take sights with your sextant.
Perpendicularity Error
Perpendicularity error is caused when the index mirror is not perpendicular to the plane of the instrument.
You can spot perpendicularity error by setting the index arm at approximately 30° and observing a step between the true and reflected arc of the sextant when viewed through the index mirror.
To correct for perpendicularity error, you adjust the screw located on the index mirror.
Side Error
Side error is caused when the horizon mirror is not perpendicular to the plane of the instrument.
You can spot side error by setting the index arm at 0°, looking at the horizon, and tilting the sextant approximately 45° to the right. Any side error will be visible as a step between the true and reflected images of the horizon.
To correct for side error, adjust the side-error screw located on the horizon mirror.
Index Error
Index error is caused when the index mirror and horizon mirror are not parallel when the index arm is set at precisely 0° using both the micrometer and the clamp.
You can spot index error by setting the index arm at 0° using the micrometer and clamp, then observing the horizon. If index error is present, it will appear as a step between the true and reflected images of the horizon.
You can correct for index error using the index-error screw on the horizon mirror. This will re-introduce some side error, so you should iterate between correcting index error and side error.
Any residual index error can then be removed mathematically when you take your sights.
Non-correctable sextant errors
As the name suggests, non-correctable errors are those that might be present in your sextant, but cannot be corrected.
Collimation Error
Collimation error is caused when the telescope is not parallel to the plane of the sextant.
On some models of the sextant, you can correct for collimation error. On most modern examples, however, collimation is a non-correctable error.
Centering Error
Centering error is caused when the pivot point of the index arm is not perfectly aligned with the geometric center of the arc of the instrument’s frame.
Prismatic Error
Prismatic error is caused when the individual faces of the mirrors or filters are not parallel to each other, so essentially their glass acts as a prism.
For example, prismatic error in the horizon mirror would be caused by the faces on either side of the horizon mirror not being parallel.
Shade Error
Shade error is caused when the individual faces of the shades are not parallel to each other. Essentially, the shades act as a prism.
Graduation Error
Graduation error is caused by imperfections in the graduations of the micrometer or the markings on the instrument’s arc.
Worm and Rack Error
Worm and rack error is caused by imperfections in the grooves that control the precise movement of the index arm.
What does a sextant measure?
A sextant is a navigational instrument used to measure angles. In celestial navigation, it measures the angle between the horizon and a celestial body (e.g. a star or a planet). Used horizontally, it can measure the angle between two terrestrial objects (e.g. a lighthouse, spire or pier).
In its basic form, a sextant is simply used to measure angles.
It is up to the navigator how to use those measurements to find their position. For example:
- the altitude of a celestial body could be used to plot a celestial line of position.
- the angular height of a charted object could be used to plot a range using trigonometry.
- the angular distance between two charted objects could be used to plot a line of position.
- all angles could be used to establish clearing bearings or ranges of charted objects.
Why is it called a sextant?
The term “sextant” is derived from the Latin word “sextus” meaning “sixth”. The sextant is so named because its arc spans one-sixth (60°) of a circle, however, due to its usage of the Double Reflection Principle, it can actually measure angles up to 120°.
The same theory applies to older navigational instruments that are not used today.
The octant is derived from the Latin word “octo” meaning “eight” because its arc spans one eighth (45°) of a circle. In a similar way to the modern sextant, octants utilising the Double Reflection principle can measure angles up to 90°.
The earlier quadrant was derived from the word “quad” meaning “four” because it covers one-quarter of the size of the astrolabe, which preceded it. Unlike the modern sextant, the quadrant did not use reflection, but could instead be used to directly measure angles up to 90°.
How accurate is a sextant?
Sextants have a micrometer or vernier that measures angles to an accuracy of 0.1 minutes of arc. This means that the sextant is accurate to within 0.002°.
When used for navigation, however, other errors often multiply throughout the process resulting in a final positional accuracy within a few miles.
If you are interested in reading detail about the accuracy of a sextant used for celestial navigation, I have written a full article comparing its accuracy to GPS: How Accurate Is Celestial Navigation Compared To GPS?
How do you use a sextant?
Now that you understand how a sextant works, you are probably keen to move on to actually using your instrument.
In summary, you can follow these basic steps.
- Plan the time and location of your sights.
- Pick up and hold your sextant correctly.
- Correct your sextant for all correctable errors.
- Locate the celestial body you are measuring by using your sextant as a telescope.
- Bring the celestial body in line with the horizon.
- Read the altitude of the celestial body using the arc and micrometer.
I have actually written a full article covering each of these steps in detail, so if you want further information you should read this article next: How To Use A Sextant: A Step By Step Guide.
Alternatively, if you are already familiar with your instrument, check out these tips to become an expert in using your sextant: 7 Tips To Use A Sextant Like A Pro.