Davis Mk15 Sextant Review
As an Amazon Associate, Casual Navigation earns from qualifying purchases.
I have recently purchased a Davis Mk15 Sextant because I was intrigued by its low price point and I wanted to compare it to the metal sextants that I have used professionally.
It is safe to say, I am impressed.
The Davis Mk15 Sextant is ideal for beginners and hobbyists, or for sailors needing a sextant for an emergency backup. As a plastic sextant, it is affordable, yet it still produces accurate results.
| Positives | Negatives |
|---|---|
| Affordable | Plastic frame |
| Highly accurate | Perpendicularity error could be easier to remove |
| Lightweight | Index arm does not move smoothly |
As a plastic sextant, the Davis Mk15 does have some disadvantages when compared to its metal competitors.
For example, the index arm does not move as freely as higher quality instruments, and the mounting on the index mirror makes it difficult to correct for perpendicularity error.
Neither of those faults, however, stop it from giving you accurate results when taking your sights.
For beginners or hobbyists especially, the price of the Mk15 easily compensates for the differences from its more expensive competitors.
I paid a little over $250 for mine, and I would expect to pay 3-4 times that amount to see the improvements from a metal sextant.
Given that its faults can mostly be overcome by practice and patience, I cannot actually fault it for what it is able to deliver.
Pro Tip: For safety-critical situations like navigating merchant or naval vessels, I would still recommend investing significantly more in a metal instrument.
What Is In The Box?
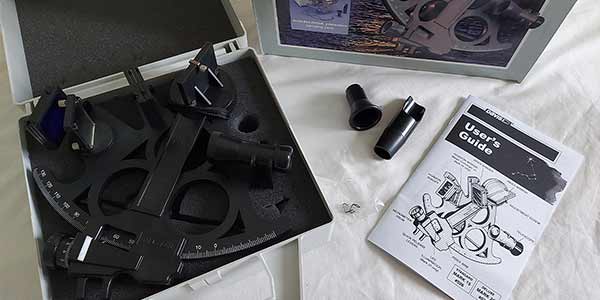
- The sextant
- A plastic case for the sextant
- Foam insert inside the plastic case
- An interchangable 3X telescope and a viewfinder
- User guide
- 2 spare clips for the mirrors
Build Quality
The first observation with the Davis Mk15 Sextant is that it is made of plastic. For anyone familiar with metal sextants, the Davis Mk15 will feel weak in comparison.
Despite the initial feel of the instrument, however, the sextant feels solid enough for its intended purpose. It is a scientific instrument that you will need to look after so that it continues to perform at its best.
Its lightweight feel continues when you rest it on its handle. More expensive instruments will have legs that stabilise them on a rolling boat. The Mk15, however, relies on its flattened handle to provide enough support. You need to be careful when you place it down outside of its box.
The mirrors themselves all feel robust, with their screws all feeling secure and giving a satisfying amount of resistance when turned.
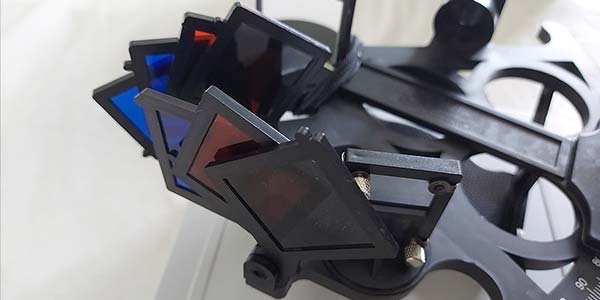
You will find three shades in front of the horizon mirror, and four in front of the index mirror. The plastic surrounds of the shades do feel a little weak, but they still feel sturdy enough for the use that is intended.
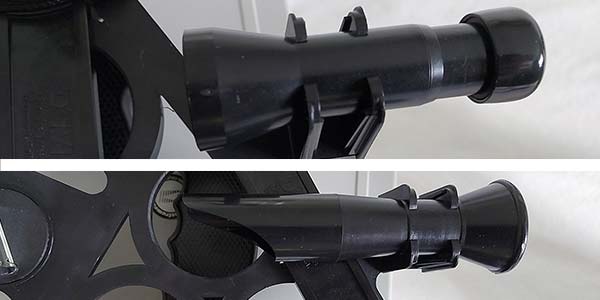
For sights, you are provided with an interchangeable sight tube and a 3X optical zoom telescope. Both feel strong and are secured so tightly into the instrument that it makes interchanging them a little tricky to begin with.
Finally, the arc, micrometer and clamp are also made of plastic so the worm-and-rack mechanism could wear down quicker than a metal one would. Again, it feels strong enough for its intended use, but I would monitor it over the long term if I started using the sextant regularly.
Overall, I am happy with the build quality of the Mk15. Although it is made of plastic, it feels rigid and strong enough to continue to perform as long as I take care of it.
Correcting The Davis Mk15 Sextant
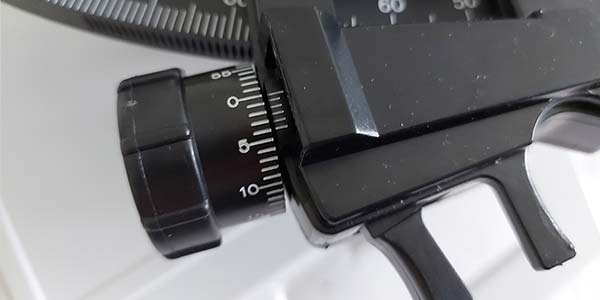
The Davis Mk15 Sextant is one of the easier sextants that I have corrected. My only criticism is that the perpendicularity error correction is a little challenging due to the size of the micrometer arrangement at the bottom of the index arm and the width of the supports around the mirror itself.
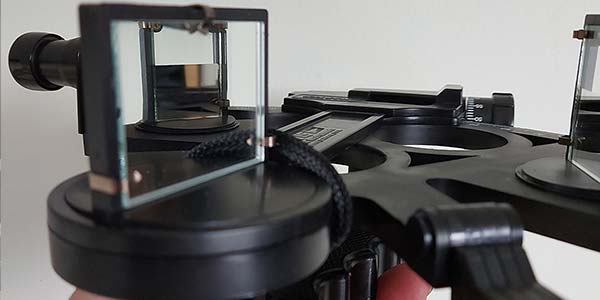
As you can see in the image above, the width of the micrometer at the end of the index arm restricts the amount of real arc visible for the perpendicularity error correction. In addition, the width of the supports around the index mirror also adds a small separation between the real and reflected arcs, again making the correction a little challenging.
With the horizon mirror, there are no such limitations and correcting for side error and index error is easy.

On the back of the mirrors are substantial screws with grips so that you can adjust them with your fingers. Other sextants use a key arrangement, but I always prefer the fingertip adjustments like on the Mk 15.
Overall, I find that correcting the Mk15 is relatively quick and easy. I particularly like that the adjustments are undertaken using your fingers rather than keys.
Admittedly this makes it more susceptible to movement while the sextant is in its box. When you perform the corrections, however, it makes it a quicker process and means that there is no key to locate every time.
Taking Sights With The Davis Mk15 Sextant
When you first use the Davis Mk15 Sextant, you may find it challenging to take sights.
With the instrument set at 0°, it is easy to focus the telescope and then locate the celestial body that you want to measure.
The challenge comes in bringing the body down to the horizon.
When you release the clamp on the index arm and begin to move it, there is a small amount of resistance to overcome. This makes the celestial body jump a little, making it hard to sweep down in one fluid movement.
With practice, you will be able to keep focused on the body, but it does add a little extra challenge when compared to high-quality metal sextants.
Once you get the celestial body near to the horizon, the micrometer is easy to turn, and lining up the last part of the sight is an easy process.
Finally, reading the altitude from the micrometer is simple. You can read whole degrees off the arc, whole minutes off the left side of the micrometer, and increments of 0.2 seconds off the right side of the micrometer.
Overall, I find that taking sights with the Davis Mk15 is simple, albeit it does take practice to bring a celestial body down to the horizon in a smooth motion.
My Verdict
The Davis Mk15 Sextant is ideal for a beginner learning how to use a sextant, or a hobbyist looking for a budget-friendly option.
Although it is more challenging than other sextants when it comes to removing perpendicularity error, I found that it was not really an issue. A beginner will be practising with a sextant a lot, so you can quickly overcome that limitation.
Additionally, the difficulties in the smooth movement of the index arm can also be an advantage for training purposes because it can be overcome with practice and does not actually impact the final accuracy of your sight.
I particularly love the fact that the Davis Mk15 Sextant is one of the most affordable sextants on the market, yet it is still capable of taking highly accurate sights.
Despite that, there are certain cases where I would not recommend the Davis Mk15. If you are a professional or are taking sights frequently, this is probably not the sextant for you. Its plastic construction might lead to wear on the worm-and-rack mechanism and degrade its accuracy over time.
This is not a problem when used for training or by a hobbyist, but when the safe navigation of a merchant or military vessel depends on it, I would consider investing in a top range metal sextant instead.