How To Use A Sextant: A Step By Step Guide
As an Amazon Associate, Casual Navigation earns from qualifying purchases.
When you first get hold of a sextant it can seem like a daunting prospect to learn how to use it.
I experienced the same feelings when I first started using mine.
In time I have learned that actually, the sextant is not really all that difficult. In fact, the whole process can be broken down into 6 easy-to-follow steps.
Pro Tip: This article assumes basic knowledge of the sextant as an instrument. If you are not familiar with the sextant, I recommend first reading: What Is A Sextant? Explained By A Ship’s Officer
Step 1. Plan the time and location of your sights
The first step with using a sextant is to make a plan.
If you are intending to measure the altitude of stars, you need to plan the time that you will take your sights as well as the approximate location of each star.
For star sights, the best time to take your sights is 30 minutes before sunrise or 30 minutes after sunset.
Once you know the time you will take your sights, you should then work out the approximate location of each star relative to your position.
It will still be too light to see entire constellations, so you should just work out a rough direction and approximate altitude of your planned stars.
As you will plan the brightest stars, those will be the first to appear in the sky anyway.
Pro Tip: A Sextant can be used during the day to measure the altitude of the sun and the moon; or to take vertical and horizontal sextant angles.
We won’t go into detail about the best time for sights in this article because I have already covered it in another post if you want to find out more: Best Times To Use A Sextant
Step 2. Pick up & hold your sextant correctly
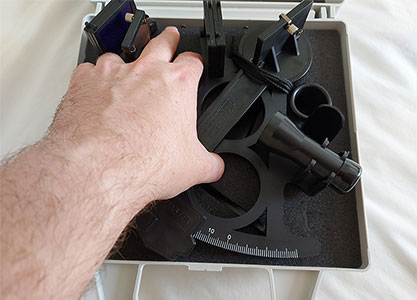
To correctly pick up your sextant, reach into the box with your left hand and take hold of the frame. As you lift it out, use your right hand to grasp the handle.

How to hold a sextant correctly

To correctly hold a sextant you need the handle in your right hand and the arc of the instrument at the bottom.
The eyepiece of the telescope needs to point in your direction so that you can bring it up to your eye and look through the telescope.
Your left hand is then free to adjust the shades and operate the index arm.
Step 3. Correct your sextant for Index Error, Side Error, and Perpendicularity Error
Now that you have taken hold of your sextant, you need to correct it so that you are ready to take a sight.
I’ll just provide a summary in this post, so check out my post on Sextant Errors And Corrections if you need full detail.
First, check for perpendicularity error by setting the index arm at around 30° and checking for continuity along the arc. If there is an error, adjust the screw on the index arm.
Second, check for side error by setting the index arm at 0°, tilting the sextant to one side and looking at the horizon. If there is a step in the horizon, side error is present and you need to adjust the side error screw to remove it.
Third, check for removable index error by bringing the sextant upright and continuing to look at the horizon. If there is a step in the horizon, adjust the index error screw to remove it.
Repeat the removal of side error and removable index error until you have removed as much as you can.
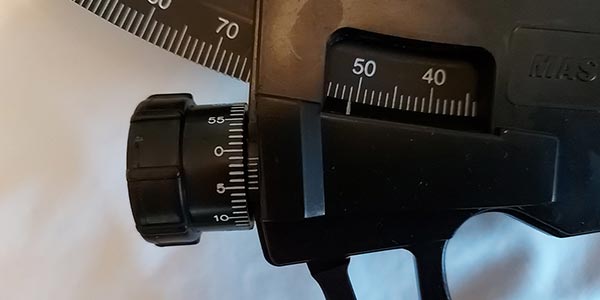
Finally, note down the residual index error by using the micrometer. You will need it so that you can remove it mathematically later on.
Step 4. Locate the body you are measuring using the telescope
With your sextant properly corrected, you need to set it to 0° and bring it up to your eye to use as a telescope.
Setting it to 0° means that there will be no separation between the images on each side of the horizon mirror.
Using the telescope, you simply need to locate the celestial body that you are intending to measure.
Once you find it, give yourself a few seconds to steady everything up before moving on to step 5.
Pro Tip: If you are measuring the sun, make sure you use the correct shades to protect your eyes.
Step 5. Bring the celestial body in line with the horizon
The trickiest part when you are using a sextant is to bring the celestial body down to line up with the horizon.
First, focus your eyes on the celestial body and adjust the micrometer to move it up and down a little bit. You want to get used to seeing its movement.
Next, try angling the sextant up and down a little bit to keep the celestial body in line with the center of the mirror as you adjust the micrometer.
When you are happily moving the celestial body with the micrometer, try the same movements using the clamp on the index arm instead. Grip the clamp with your left hand and adjust the angle of the sextant in your right hand. You need to keep the celestial body in the center of the mirror.
Finally, bring the sextant down until it is perfectly level and you can see the horizon as well as the celestial body.
If the clamp does not allow the body to stop precisely on the horizon, adjust the micrometer slightly until the horizon and the celestial body are perfectly lined up.
How to use a sextant on land
To use a sextant on land, you either need an artificial horizon or a bubble sextant. At sea, we can use the horizon, but on land, we need to simulate the horizon instead.
A bubble sextant works on the same principle as a spirit level. The idea is that you complete the same procedure that we outlined above, but instead of lining the celestial body up with the horizon, you use the bubble on your sextant to get it perfectly level instead.
An artificial horizon consists of a reflective liquid that acts like a mirror sitting perfectly flat relative to the earth’s surface. You use your sextant to measure the angle between the true celestial body and its reflection. Dividing the result by 2 then gives its altitude.
The most common artificial horizon I have seen is the Davis Instruments Artificial Horizon (available from Amazon) if you would like to take a closer look.
Step 6. Read the altitude of the body from the arc
The final step in using your sextant is to read the altitude that you have measured using the arc and micrometer drum.

The magic of the sextant is that you are literally just reading the angle between the horizon mirror and the index mirror.
In actual fact, the angle between the mirrors is actually half of the angle that you are reading because the sextant works using the principle of double reflection. This is why the sextant only covers ⅙ of a circle, yet it can measure angles up to 120°.
The entire principle is too complicated to cover in this section, so check out “How Sextants Work: An Illustrated Guide” if you would like to find out more.
Step 7 (optional): Use your readings to calculate your position
Once you have obtained a reading using your sextant, you can use it to calculate a line of position.
Each sight can give you a single line of position, so taking three or more simultaneous sights can give you a complete celestial position fix.
The mathematics can be complex, but I have covered it all in this video if you would like to see me walk through it.
Tips For Using A Sextant
My biggest tip for getting better with a sextant is to practise as often as you can. It is impossible to learn how to use a sextant without practising with it.
Through practice, you will become intimately familiar with your own instrument and find it much quicker to complete corrections, bring stars down to the horizon and take readings.
In addition to practising, I have compiled a list of my top 7 tips for using a sextant in this article: 7 Tips To Use A Sextant Like A Pro
Alternatives to using a sextant
There is no true alternative to using a sextant, but there are different instruments and technologies that you can use to achieve a similar result.
A digital sextant can remove a lot of the manual work, making celestial position fixing much easier.
Otherwise, you need to rely on satellite-based position fixing through technology like GPS, or terrestrial-based position fixing through technology like eLoran.
When all your electronics fail though, there is no better alternative than a celestial position fix using a sextant.
