SeaNav: Reviewed By A Professional Navigator
On a recent sailing trip, I wanted to try using my iPad as a chart plotter to complement the paper charts I usually use.
Rather than selecting one app, I decided to purchase as many as I could so that I could test and compare them. One app on test was SeaNav, by Pocket Mariner.
SeaNav is a nautical charting app with excellent pricing and innovative features like Augmented Reality. Its basic navigational functionality is intuitive to use, although it does struggle against the competition in terms of visibility of your boat shape and navigational data.
Despite that, I would still be happy to recommend SeaNav for use, depending on the type of vessel you have and exactly where you plan on mounting your tablet.
| Positives | Negatives |
|---|---|
| Excellent price | Not available on Android |
| Simple route planning | Own vessel is hard to see |
| Innovative features like Augmented Reality | Navigational data is small |
| Basic NMEA integration | Chart can be slow to load |
| Automatically downloads relevant charts |

Note: Unlike most other apps that I tested, SeaNav is only available for Apple devices.
When you first download SeaNav, you can access the app for free and then visit their in-app store to purchase the charts that you want to use.
Charts cover a wide geographical area, so you would likely buy a pack covering an entire country. Once purchased, you can view any part of the chart, and as you pan around SeaNav will download them to your device.
I found that while doing my passage planning at home, SeaNav automatically downloaded all the cells that I needed for my trip.
SeaNav is similar to other maritime chart apps in that it displays vector charts which can be customised by selecting the layers you wish to view. I did not actually need to customise mine because my screen was never too cluttered with extra information.
Coverage in Estonia, Finland and New Zealand seemed to only be through raster charts, so if you are planning on purchasing those, be aware that the vector functionality will not apply.
Passage planning was both simple and intuitive. I was able to plan my entire trip without consulting the user guide for the app at all.
In navigation mode, the SeaNav chart remains clear and even has extra data like automatic tidal diamonds showing the present set and rate of the tide.
My main criticism of the app was that in navigation mode, I found both the boat shape and supplementary information quite hard to read. The text was small, and the boat outline was small and lacking contrast compared to the underlying chart.
When holding my iPad in my hand, it was fine to read.
On my boat, however, I put the iPad safely in the companionway so it was a meter or two away from me. At that distance, it was very hard to see anything apart from the underlying chart.
As such, I would only be truly happy to use SeaNav on boats where the iPad is mounted close to the conning position. I did like the chart display, but the issues with the visibility of supplementary information meant that I would choose other apps before using SeaNav on my own boat.
If you are considering downloading SeaNav, you might be interested in this comparison where I compare 8 different charting apps that I tested on one sailing trip: Top 8 Apps For Marine Navigation (Judged By A Navigator).
SeaNav pricing
SeaNav has a similar pricing structure to other marine navigation apps. The app itself is free to download from the App Store, then you choose which charts you want to subscribe to.
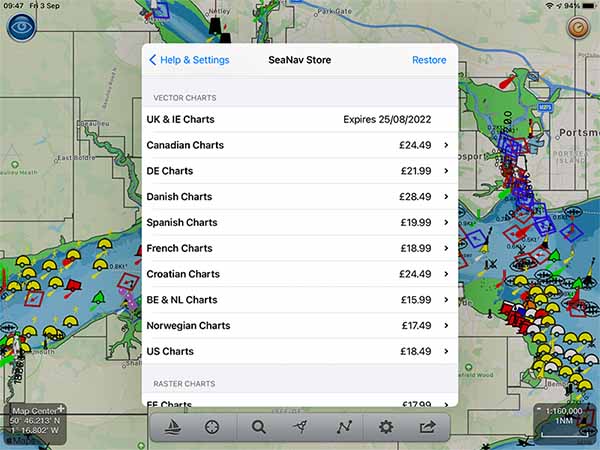
In my case, I purchased a set of UK & IE Charts for £19.99 ($28).
There is the option to add Internet AIS & Augmented Reality for an additional £9.99 ($14), but I did not purchase that part myself as I did not need that functionality.
The cost of SeaNav is one of the most competitive that I tested. I am really impressed with their chart pricing.
What charts does SeaNav use?
SeaNav predominantly uses vector charts, although Estonia, Finland and New Zealand are available as raster charts.
Chart data is derived from national hydrographic organisations and presented to you by SeaNav.
As the charts are presented in vector format, you have full control over the customisation of the display.
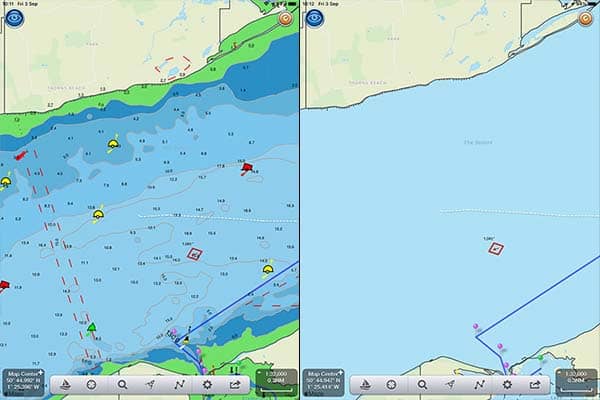
You can see in the image above that it is possible to turn off excess layers when you find the screen too cluttered.
Of course, you need to be careful incase you turn off too many layers because you could end up missing vital information.
Pro Tip: Always navigate with as many layers turned on as you can. Only turn off layers when the screen becomes unsafe to use due to cluttering.
When you tap on any of the icons on the chart, information about the icon immediately pops up. Interrogating for more data brings up all the information about the object.
Interestingly, I found that SeaNav and NavLink looked identical in terms of charts and app functionality. If you already have NavLink, I recommend that you don’t need to look at SeaNav as you will barely notice a difference.
You can read my full review of NavLink here: NavLink: Reviewed By A Professional Navigator.
Downloading charts with SeaNav
With an internet connection, you can access all the charts within your subscription. As you zoom in to each area of the chart the app downloads the areas you are looking at.
Essentially, as long as you plan your passage in advance, the app will automatically download all the areas that your passage passes through.
If in doubt, within the settings menu, you can go to “Manage Charts” to see the areas that you have already downloaded, or to manually download other areas.
Any charts that you have already downloaded will work offline.
Passage planning with SeaNav
I found passage planning on SeaNav was both easy and intuitive.
At the bottom of the screen, you have a menu with different icons.

Intuitively, the route & tracks option is the one that looks like a series of waypoints connected by a line.
Tapping that brings up a menu where you can select “New Route”. To place waypoints, press and hold anywhere on the chart and a small menu comes up where you can select “Add Waypoint Here”.
You can just repeat the process to create a series of waypoints to make up your route.
Pressing and holding any of the previously placed waypoints allows you to move them around as you like.
Overall, I found that passage planning with SeaNav was simple, quick and easy. I had no previous experience with route planning on the app, yet I was able to create my route without consulting any of the documentation.
Navigating with SeaNav
To navigate using SeaNav, you just select the small yacht icon to switch it into “Sailing Mode”. If you don’t have GPS enabled, a little warning pops up telling you to switch it on first.
If you don’t have a GPS iPad, the popup advises you that you can use an external Bluetooth GPS instead.
My iPad is a WiFi-only model which does not have GPS so I bought a Garmin GLO 2 Bluetooth GPS to use SeaNav. You can check out my review of it here: Garmin GLO 2 Review.
Once in sailing mode, you get additional data displayed at the top of the screen.

It tells you your speed, course, position and distance to the next waypoint.
Unfortunately, on a small screen, the data can be quite hard to read. I placed my iPad safely in the companionway of my boat, so was sat a meter or two away at the helm. It meant that I could not actually read the speed from where I was sitting.
On the chart itself, your vessel is displayed as a small ship shape with a vector. Behind your boat is the past track.
Again, I found that the image was very small and hard to see in the bright light I was experiencing. The contrast between the boat and the surrounding water was not that great.
One of the best parts of the navigation screen is the distance measuring tool. It was one of the most simple to use out of all the apps I tested.
You simply tap the dividers, then click and drag each end of the line that appears on the screen. I found it to be a great feature and intuitive to use.
Another brilliant feature is the tidal diamonds that update automatically, telling you the set and rate of the tide at each diamond. You can click on them and bring up a graph to scroll forward in time to plan ahead a little bit while navigating.
Overall, navigation in SeaNav was easy and intuitive, but a lot of the information was hard to see because it was so small.
This would not be an issue on a boat where you are constantly holding your iPad, but if you plan to leave it a few meters away as I did, then it is likely you will struggle to see everything clearly.
SeaNav & NMEA
During my testing, I did not link SeaNav to anything else through NMEA because my boat does not have any other NMEA equipment fitted.
The app does, however, offer functionality to draw on limited data through your boat’s NMEA wireless interface.
From what I can tell, you can use depth data as well as wind speed and direction.
Positional data still comes from your iPad or Bluetooth GPS.
Usability
I found that SeaNav was both simple and intuitive to use.
Panning and scrolling around the chart was easy, and most of the time it was smooth. There were a few occasions when the charts took a few seconds to load, but it didn’t feel like anything too serious.
Interestingly, it was much quicker than the almost-identical NavLink app.
One slightly odd experience was that once you change settings on the chart, I needed to move it a little to reload the screen with my new settings. I understand that it was probably stored in the cache for speed reasons, but it would have been nice to automatically refresh whenever you change settings.
For a new user picking up SeaNav, I think you will find it quick to learn, especially if you already have a little experience with vector charts from other applications.
My Verdict
Overall, I would be happy to recommend SeaNav, but only for users who plan to navigate with their iPad close to their conning position.
The difficulties in seeing the boat shape and the navigational data mean that it is not the best app to be used on an iPad sitting far from the user.
The chart itself is great, and I love the automatically updating tidal diamonds. You get a lot of control over the layers shown on the chart, and everything is clear and simple.
Passage planning is quick and easy, so you will be able to get up and running quickly.
Its low price point is particularly attractive, making it a great app if you want to experiment with learning about vector charts using an iPad.
Unfortunately, it is only available for Apple devices, so users with an Apple tablet and an Android phone will not be able to use it interchangeably on both devices. If you have an iPad and iPhone, however, you can use the same charts across both devices.
Frequently Asked Questions
Does SeaNav require an internet connection?
SeaNav requires an internet connection to download charts and updates, but once the charts are downloaded to your device it will work offline.
You can check which charts are downloaded, and manually select if you want any additional ones adding.