6 Methods For Celestial Navigation
As an Amazon Associate, Casual Navigation earns from qualifying purchases.
Celestial navigation is a scientific art form that uses the sun, moon, stars and planets for navigating across the surface of the earth.
It may seem like a daunting prospect to master, but it is actually easier than you realise. Rather than learning everything at once, you can break it down into six main techniques.
- Position from Marcq St. Hilaire (intercept) method at twilight
- Position from “Sun-Run-Sun”
- Latitude from Polaris
- Longitude by Merpass
- Latitude by Merpass
- Compass errors by azimuth
The Marcq St. Hilaire Method is the classic way of undertaking a celestial position fix. You measure the altitude of 6 celestial bodies at sunrise or sunset. You just need the sky to be bright enough to see the horizon, but also dark enough to see the stars.
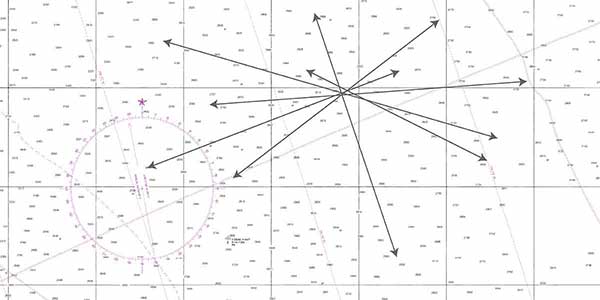
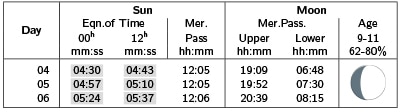
Each sight gets plotted onto a chart, giving a line of position. You can then work out your final position fix as the point where all your position lines intersect.
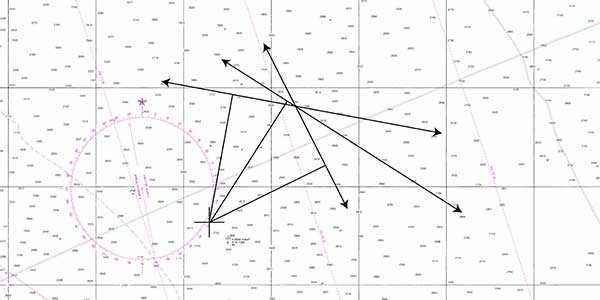
The other way of finding your position is to use the “sun-run-sun” technique. This is basically a running fix, using a celestial line of position from the sun as your position line.
To complete a sun-run-sun, you need to take sights a couple of hours apart so that the angle between them is large enough to get an accurate fix. You transfer your first line of position using your course and speed in the same way you would with a terrestrial running fix.
Other celestial navigation techniques can be used to find either your latitude or your longitude, but not both.
You can find your latitude from Polaris, the North Star. It wobbles around a little bit, but generally, it will be directly overhead when you are at the north pole. At that point, Polaris’s altitude is 90°, and your latitude is also 90°.
Similarly, when you are on the equator, Polaris appears to have an altitude of 0°, matching your longitude.
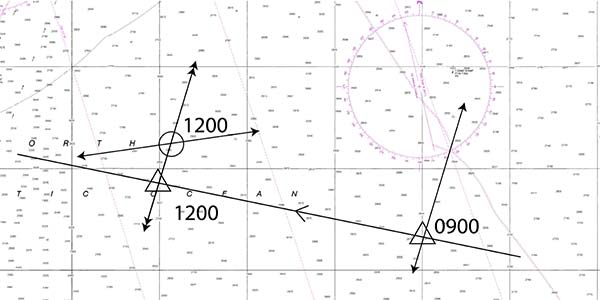
For longitude, it is possible to use merpass. Merpass is the meridian passage of the sun, which is the point at which the sun is at its highest point in the sky. If you measure the precise time of merpass, you can compare that to the time of merpass on the Prime Meridian.
Due to the rotation of the earth, the difference in time corresponds directly with your longitude.
The time of merpass coincides with the time when the sun is either directly north of you, or directly south of you. If you take a standard sun sight at merpass, it will also give you your latitude. This is your latitude by merpass. Combining that with your longitude at merpass, you can get a full position fix from a single sight.
The final use of celestial navigation is for calculating your compass error by azimuth. Using a nautical almanac, you can calculate the azimuth, or bearing, of any celestial body from your position. Comparing the calculated azimuth to the compass bearing lets you calculate the error in your compass.
Pro Tip: I learned celestial navigation from college, but always found one book particularly useful for brushing up my skills: Celestial Navigation, by Tom Cunliffe (link to Amazon).
Position by intercept (Marcq St. Hilaire) method at twilight
The classic celestial position fix is an intercept fix, taken either at sunrise or at sunset.
Normally, you would plan to take six sights, in the hope that at least three of them will be available to take, and not obscured by cloud cover. Then, using your sextant you measure the altitude of each one above the horizon, noting down the precise time that you take your measurement.
This is why the sights can only be taken at sunrise or sunset. The sun needs to be below the horizon so that stars and celestial bodies are clearly visible in the sky. It can’t be too dark though, because you need a clear and crisp horizon to measure against.
Pro Tip: It is possible to take sights all night if there is a bright moon available to light up the horizon.
Once you have taken your sights, you compare the measured altitude to an altitude you calculate from the nautical almanac. The difference between the two gives you an intercept for each star.
Once you have at least three intercepts, spread around 60° apart, you can plot them and get a celestial position fix.
This method of celestial position fixing is quite complicated to explain in this article, but I have made a complete video walking you through the entire process.
Advantages of position fixing using the intercept method
The intercept method allows you to calculate a full position fix using a complete set of stars at a single point in time.
It is the only celestial navigation method that gives you a full fix at a single time. This removes potential sources of error that could come from transferring lines of position which would be needed with other celestial navigation methods.
Although there is still a small amount of transferring lines of position, it is only over a matter of a few minutes, minimising potential sources of error.
In addition to minimising errors from transferring lines of position, taking multiple sights at the same time helps to eliminate errors from single sights.
On a set of six sights, it will be immediately obvious if one of them is wildly incorrect because it will not intersect where the other lines do.
With other celestial techniques, you only get a single line of position, so there is nothing to confirm that your position line is in the correct area.
Disadvantages of position fixing using the intercept method
The main downside of position fixing with the intercept method is in the timing of the sights. They can only be taken at twilight.
You only get a maximum of two fixes per day.
If there is cloud cover, or you make a mistake planning your sights, then you do not get another chance until the next twilight.
Assuming you even managed to get sights at the previous twilight, there would be 24 hours between sights.
Cloud cover is a disadvantage common to all methods of celestial navigation but can be a particular problem with twilight sights. With other methods, you are more flexible with timing so you can wait until the cloud clears.
With twilight sights, you don’t get that option.
This celestial navigation method can give you the best fix, but it is also the hardest to get. As with all celestial navigation techniques, it is best used in conjunction with other methods.
Position by “sun-run-sun”
The “sun-run-sun” technique is similar to a running fix that you would complete using a terrestrial reference point. Instead of using a terrestrial object like a lighthouse, you use the sun.
In the same way that you take sights of stars for a twilight fix, you can take a sight of the sun at any time of the day.
You measure the altitude of the sun above the horizon and compare it to the height you would expect it to be based on your estimated position. The difference between the two gives you an intercept that you can plot on the chart.
Plotting a single intercept gives you a single line of position.
A couple of hours later, you take a second sight of the sun to get a second line of position.
Using your vessel’s log to determine course and speed, you can transfer the first line of position to the same time as your second line of position.
This gives you two lines of position, one is real and one is transferred. The intersection between the two gives you an estimate of your position.
You can repeat the process throughout the day, progressively building in more lines of position to get a more accurate fix.
Pro Tip: You can plot a fix after taking only one sight if you transfer lines of position from your morning twilight fix.
The accuracy of a sun-run-sun fix depends upon the accuracy of the position line transfer just as much as it does on the accuracy of the sight itself.
A longer time between sights will decrease the accuracy of the position line transfer.
Advantages of position fixing using “sun-run-sun”
The major advantage of using a sun-run-sun is that it can be taken at any point throughout the day.
When there is cloud cover for an hour, you can just delay the sight until the cloud has cleared enough to get your next sight.
Using the sun as your celestial body means that the horizon should be visible because there will be plenty of light whenever you take your sight.
In addition to that, the sun is an obvious celestial body. There is no chance of mistaking it for anything else in the sky at the same time. With stars, it can be easy to misidentify them, resulting in an erroneous fix.
Disadvantages of position fixing using “sun-run-sun”
The main disadvantage of using a sun-run-sun is that it involves transferring a line of position.
When you transfer a line of position, you rely on an accurate measurement of your course and distance travelled to calculate the transfer.
Theoretically, you are limited to knowing your water speed, and your heading. It is possible to estimate the current you have experienced, and maybe your drift due to the wind.
Errors will still creep into the transfer though, and they will increase as the transfer time increases.
Most modern ships do use GPS to calculate an accurate ground track and speed, but when you need to rely on celestial navigation you need to assume the GPS will not work.
Latitude by Polaris
The principle of calculating your latitude by Polaris is that Polaris is located at the celestial north pole.

The further north you go, the higher it appears in the sky.
It is easiest to illustrate at its two extremes. At the north pole, you are at a latitude of 90° and you would measure Polaris with an altitude of 90°, directly overhead. At the equator, you are at a latitude of 0°, and you would measure the altitude of Polaris at 0°, on the horizon.
At intermediate latitudes, the same principles also apply. This is because of the laws of conservation of angles between parallel lines and circles.
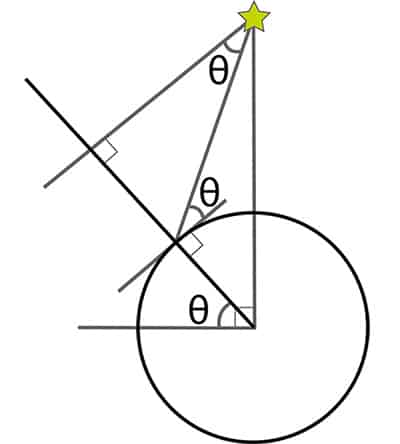
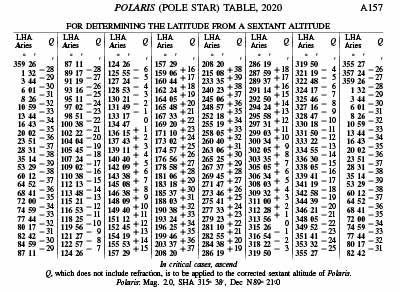
In reality, Polaris follows a small circular path through the sky because its declination is 89° 12’ 50.8” rather than 90°.
The result of this is that you need to apply a small correction to the height of Polaris based on your position of the earth. As with everything for celestial navigation, the correction you need to apply can be read from tables in the nautical almanac.
Similar to other star sights, you need to have a clear view of the horizon to be able to measure the altitude of Polaris. This means that you need to take the sight at twilight, either at sunrise or at sunset.
Once you have measured your latitude from Polaris, you can combine it with other lines of position to get a fix.
You could transfer a sun sight, from a sun-run-sun, or you can combine your latitude by Polaris with a set of morning or evening star sights. You can even transfer a longitude from merpass and plot your latitude and transferred longitude together.
Advantages of finding latitude by Polaris
The major advantage of finding your latitude by Polaris is that there is less mathematics involved than other sights. This reduces the chance of introducing errors to your calculations.
It is a quick way of plotting your latitude onto the chart.
Plotting your latitude on the chart is the equivalent of plotting a single line of position, without needing to measure any bearings. Your single line of position just runs along a parallel of latitude.
Disadvantages of finding latitude by Polaris
Using Polaris to find your latitude carries similar disadvantages to other celestial techniques in that it only provides you with a single line of position.
To give you a useful result, you need to combine it with other lines of position to get a fix.
To combine it with other lines of position, you either need to transfer those lines to the time of your Polaris sight, or you need to transfer your Polaris sight to the same time as your other sights. Either way, you need to transfer a line of position.
Transferring a line of position introduces the same errors that we discussed in the paragraph above where we covered the “sun-run-sun” fix.
In addition to errors suffered by transferring a line of position, finding latitude by Polaris is disadvantaged by needing twilight for the sight. In the same way that twilight sights are restricted to a short time window, latitude by Polaris is similarly restricted.
Longitude by “merpass”
Longitude by merpass is a method of calculating your longitude using the meridian passage of the sun.
The meridian passage of a celestial body is the time where it is at its highest point in the sky according to an observer.
You can aim your sextant at the sun before merpass and keep watching it as it rises higher in the sky. At the point where it stops getting higher, you can note down the time of merpass.
Then, you can use the Nautical Almanac to find the time of merpass on the prime meridian.
The difference between the two times gives you your longitude-in-time. It is the time it has taken for the earth to rotate between the prime meridian and your location.
We know the earth rotates at 15° per hour, so you can use that to find the angular difference between your location and the prime meridian.
As the prime meridian is at 0° longitude, the angular difference between your location and the prime meridian coincides with your longitude.
Advantages of longitude by merpass
The main advantage of longitude by merpass is that you can get a single line of position, independent of the accuracy of your sextant.
Your sextant only needs to be sufficiently accurate to know whether the sun is still getting higher, or it is getting lower. Indeed, it is possible to get a longitude by merpass without using a sextant at all.
Instead, it relies entirely on the accuracy of your chronometer.
You may consider it a disadvantage that finding longitude by merpass relies only on the chronometer. Once you recognise that all other celestial fixes rely on the chronometer in addition to the sextant though, it becomes an advantage that this technique only needs the chronometer.
Disadvantages of longitude by merpass
The biggest disadvantage of finding longitude by merpass is that it is very difficult to log the precise time of merpass.
Consider how fast the sun appears to rise up in the sky on a normal day. It is a relatively slow process.
Then consider how difficult it will be to tell when it stops rising up and starts falling.
From experience, there is always a window of a minute or two where the sun appears stationary. Its ascent slows to become imperceivable, so you only notice it when the descent happens enough to measure.
Latitude by “merpass”
Latitude by merpass is a special case of taking a normal sight of the sun as you would when doing a “sun-run-sun”.
The special case is that at merpass, the sun will be either directly overhead, directly north of you, or directly south of you.
The position line that it gives will be parallel to the parallels of latitude.
This means that instead of plotting it on a chart, you can use mathematics to calculate your latitude directly.
Combining your latitude by merpass with your longitude by merpass, theoretically, you can plot a fix directly onto the chart.
Compass errors by azimuth
Arguably the most common use of celestial navigation on modern ships is to measure their compass error using an azimuth of a celestial body.
Even in the age of GPS navigation, we still take compass errors every watch using celestial bodies.
Traditionally, you would need to start with your position from your celestial fixes. Nowadays, you can start with your GPS position instead.
You then use your Nautical Almanac to calculate the azimuth of a celestial body that you want to use to check your compasses.
An azimuth is just the bearing that the celestial body should be from your location.
Finally, you take the bearing of the celestial body using your ship’s compass, at the precise time you calculated.
The difference between the bearing you measure and the azimuth of the body gives you your compass error.
In the past, it was incredibly important to take regular compass errors because a magnetic compass is subject to ever-changing variation and deviation.
Nowadays, with gyrocompasses, you find that the error in your gyro is a lot more consistent that the magnetic errors ever were.
None-the-less, it is still vitally important to always know the error in your compass because it is the most important tool for navigating at sea.
Advantages of taking compass errors by azimuth
The major advantage of using azimuths for taking compass errors is that they can give an accurate compass error at sea.
Without using azimuths of celestial bodies, you would need to use land-based features instead. When you have spent a few weeks crossing an ocean, it’s much safer to reach land knowing how accurate your compass is in advance.
Continuous monitoring of your compass for errors is important because you will be using it to steer the vessel. If there is even a small error, over thousands of miles of ocean passage you can end up a long way off course.
Disadvantages of taking compass errors by azimuth
As with all celestial navigation, the main disadvantage of taking compass errors by azimuth is that the celestial bodies may not be visible when you need them.
It is much less of an issue for compass errors than it is for position fixing, however. You do not need a clear horizon to take a compass error, so you can do it at any time overnight.
You can even use the sun during the day to take an azimuth.
Other celestial navigation methods
We have only touched upon a few of the main celestial navigation methods in this article.
Celestial navigation is a whole scientific art form in itself, so there is an infinite number of ways you can use it to navigate at sea.
If you are creative with the mathematics, you can come up with lots of other techniques to navigate with celestial navigation as well.